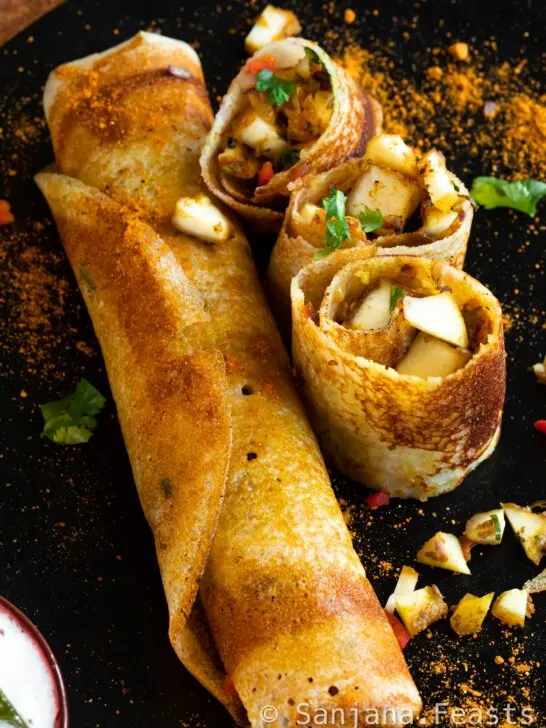
Learn how to make perfect, crispy Paneer Masala Dosa. These South Indian restaurant-style dosa are stuffed with chunks of spicy paneer masala.
In this post, you can watch how to make Paneer Masala Dosa with a step-by-step recipe and video.
From fermenting the dosa batter, to learning how to spread thin dosa, as well as dosa cooking techniques, this is the ultimate guide to making Paneer Masala Dosa at home.
If I were to write a love letter to paneer, I would absolutely pen it on a thin and crispy parchment of dosa.
Sanjana Feasts

What is paneer dosa made of?
Paneer dosa is a type of dosa, a savoury Indian pancake, that is stuffed with paneer, a type of Indian cheese. The dosa batter is made of fermented rice and urad daal (lentils).
The paneer filling typically includes paneer, onions, tomatoes, and spices like cumin and coriander.
The dosa is cooked on a griddle (tawa) until crisp, and the paneer filling is added on top before folding the dosa in half. It is often served with chutney and sambar, a lentil-based vegetable stew.
Tips for Making Amazing Paneer Masala Dosa
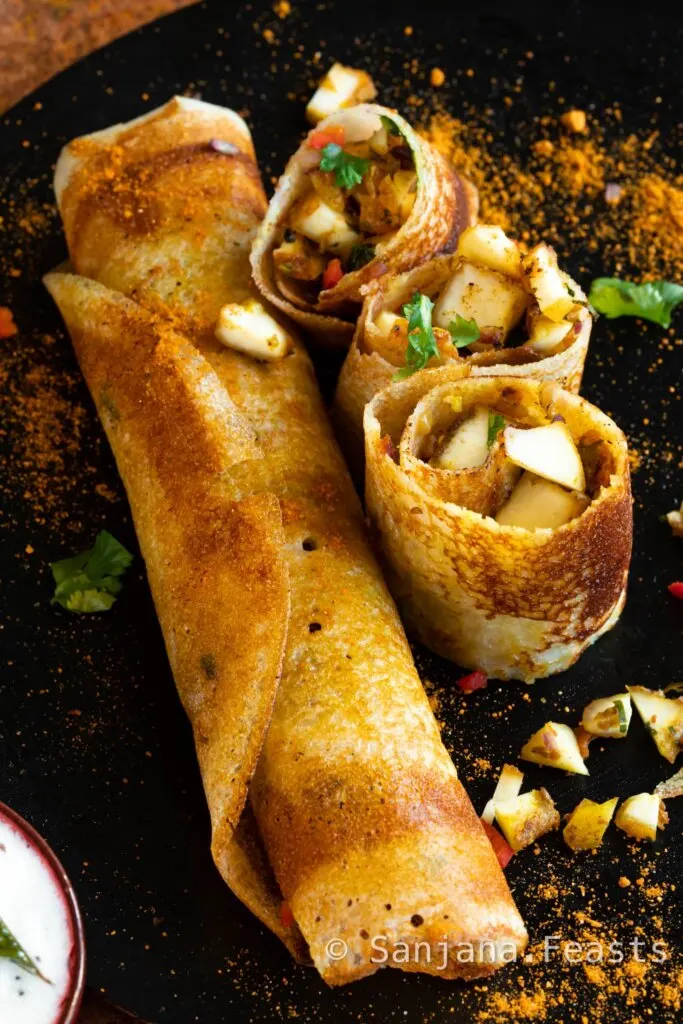
Making a perfect Paneer Masala Dosa is all about getting the right ingredients and the perfect cooking technique. Here are some tips and tricks.
1. Invest in a good quality tawa or non-stick pan
A good quality pan will help you cook the dosa evenly and prevent the batter from sticking to the pan. Opt for the flattest well-seasoned cast iron or anodised aluminium tawa.
In a pinch, you can also use a non-stick frying pan but the dosa may not be as crispy as cast iron-cooked dosa.
2. Choose the right rice
Idli rice (parboiled rice) has the ideal amount of starch for making dosa at home. Add a small amount of Basmati to heighten the aroma.
If you can’t find idli rice, another short grain rice like sona masoori or even Thai Jasmine rice works well.
You will also need white urad daal (skinless black gram).
3. Soak the rice and daal
Soak the rice and white urad daal for at least 6 hours, or up to 8 hours. This will ensure the rice and lentils are well hydrated so they grind and ferment properly.
4. Grind the rice and daal separately before mixing
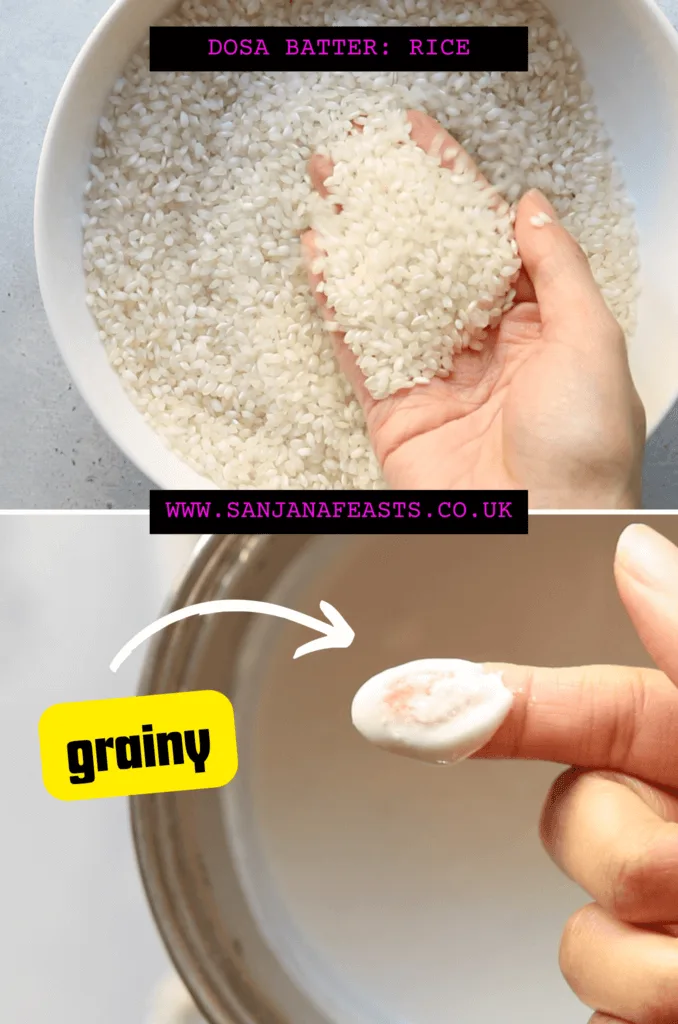
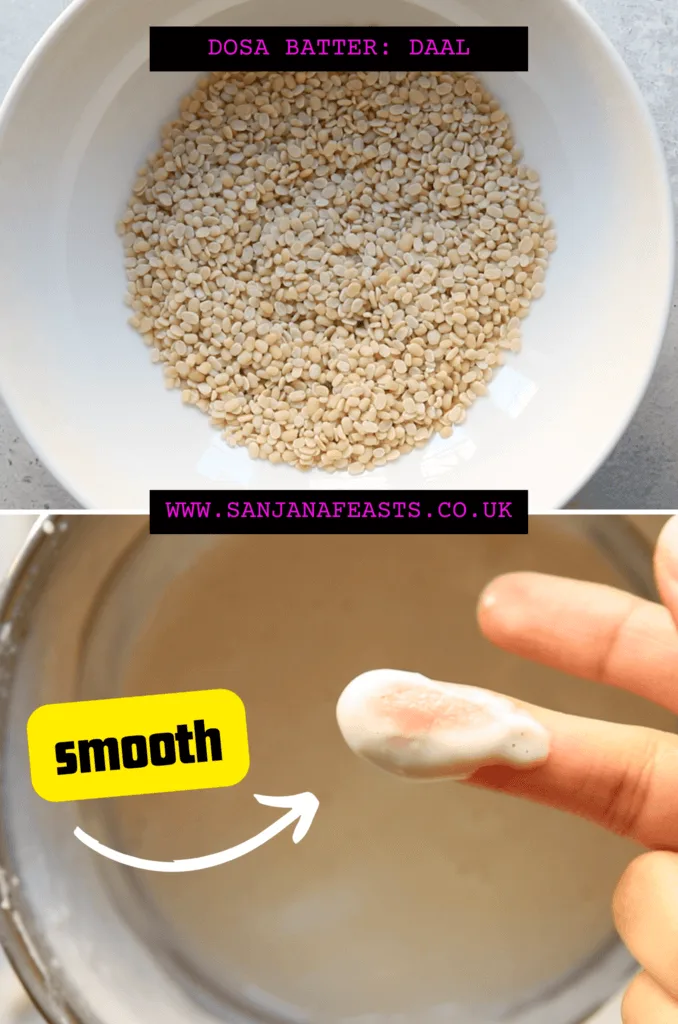
The rice batter should be mostly smooth, but still a little grainy, like that of a gentle exfoliator. This will produce crispy dosa.
Indeed, it might seem tedious but this is the trick to getting the perfect, spreadable consistency for dosa.
The daal, methi and poha batter should be totally smooth. Its’ viscosity is what gives the batter a uniform body.
Mix the two batters together at the end using your fingers. The dual texture batters create the perfect dosa!
5. Ferment the batter well
The key to making a perfect dosa is to ferment the batter well. 8-10 hours will usually suffice, but if it’s cold, it can take longer.
Fermentation helps to create the right texture and sour flavour of the dosa. Look for billowing air bubbles.
However, do not add salt until the very end, after the batter has fermented. Salt will slow down the fermentation process.
Keep the dosa batter in a large, deep bowl, in a very warm place to encourage quick fermentation.
Oh, and before stowing away, whip the batter with your fingers for 3-4 minutes. The heat from your hands warms it for speedy fermentation, too.
6. Use the right batter consistency
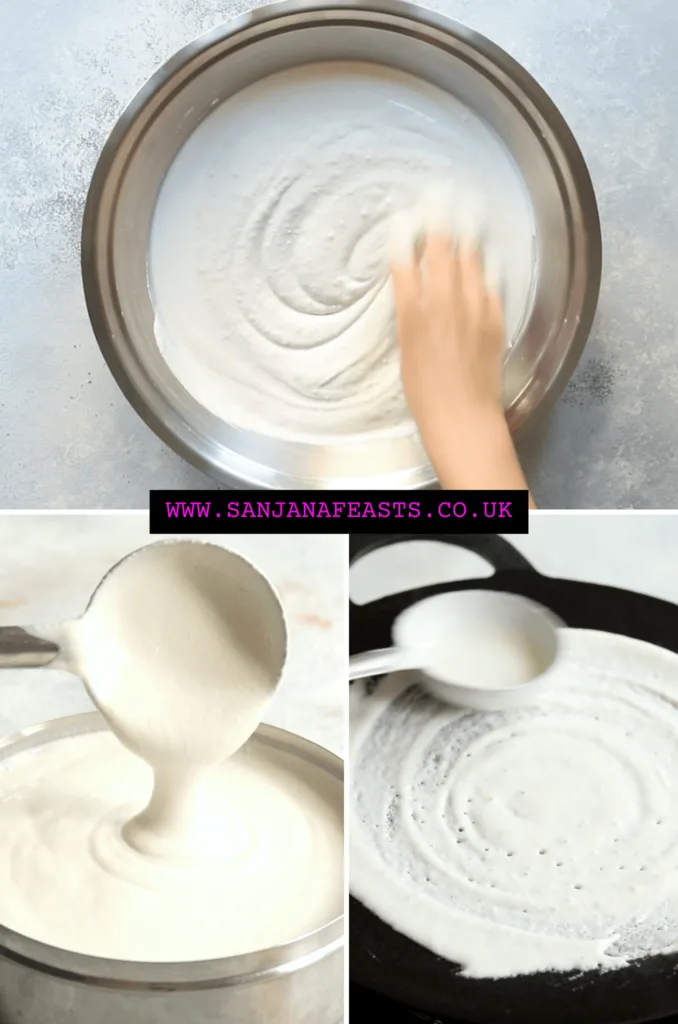
The consistency of the batter plays an important role in making the perfect Masala dosa.
The batter should be thin enough to spread evenly on the pan but thick enough to hold the filling.
Add no, or very little water when grinding the soaked rice and lentils. You can always add more water at the end but you can’t take it away!
7. Spread and cook the dosa over a medium heat
Cooking the dosa on medium flame ensures that it cooks evenly and gets a crispy texture all over the bottom.
Temper the hot pan with a splash of water, then spread a very small amount of oil over the surface of the pan using half an onion or kitchen towel.
Too much oil on a lukewarm pan will result in the batter sliding around all over the place. Not good. Use a medium hot pan (you can turn it down later) and very little oil until the batter is spread (then you can add more oil).
8. Spread the paneer filling evenly
The paneer filling is a crucial element in the Paneer Masala Dosa. Finally, spread it evenly on the dosa to ensure that you get a bite of the filling with every bite of dosa.
Ingredients for Paneer Masala Dosa

For the dosa batter
- Idli rice – parboiled short-grain idli rice is available in South Asian supermarkets
- Basmati rice – any long-grain Basmati will do. It adds excellent flavour.
- Poha – flattened rice flakes. These will make the dosa lovely and crispy. They do not need to be soaked prior to grinding
- Methi (fenugreek seeds) – these will add lots of flavour and encourage quick fermentation of the dosa batter
- Water – use water sparingly when grinding the dosa batter
For the paneer masala
- Paneer – feel free to use shop bought paneer as I have done here. Homemade paneer produces an amazingly soft and creamy texture, should you have time to make it.
- Ghee or oil – I use ghee for added richness, but feel free to use any cooking oil
- Cumin seeds – whole brown cumin seeds for a deep earthiness
- Black pepper – Crack whole black peppercorns coarsely just before using for the most potent heat
- Asafoetida – ‘hing’ or asafoetida is a spice derived from the gum of a tree. It has a strong onion/garlic flavour. Optional.
- Chillies – I like using Indian green finger chillies but you can use any chillies you like, or even chilli powder.
- Onion – chop the onion finely so that it browns quickly
- Tomato – again, chop your tomato finely so it softens into the onion masala fast. Use 2-3 teaspoons of tomato purée and some water if you don’t have fresh tomatoes
- Ginger – mince fresh ginger finely or slice into juliennes
- Garlic – crush or mince
- Curry leaves – finely chiffonade into thin strips
- Fresh coriander leaves – we add these into the spice tempering along with curry leaves, and at the end
- Turmeric – for a beautiful colour
- Garam masala – a warming Indian spice blend. Use shop bought, or try my Homemade Garam Masala recipe
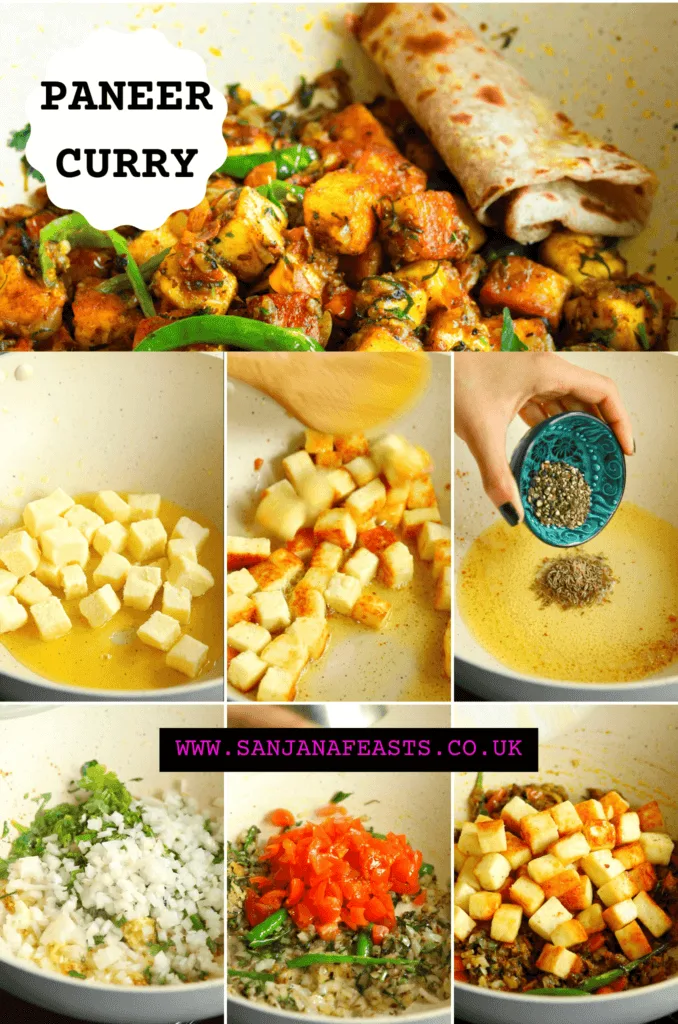
Steps for making Paneer Masala for Dosa
1. Lightly-fry the paneer
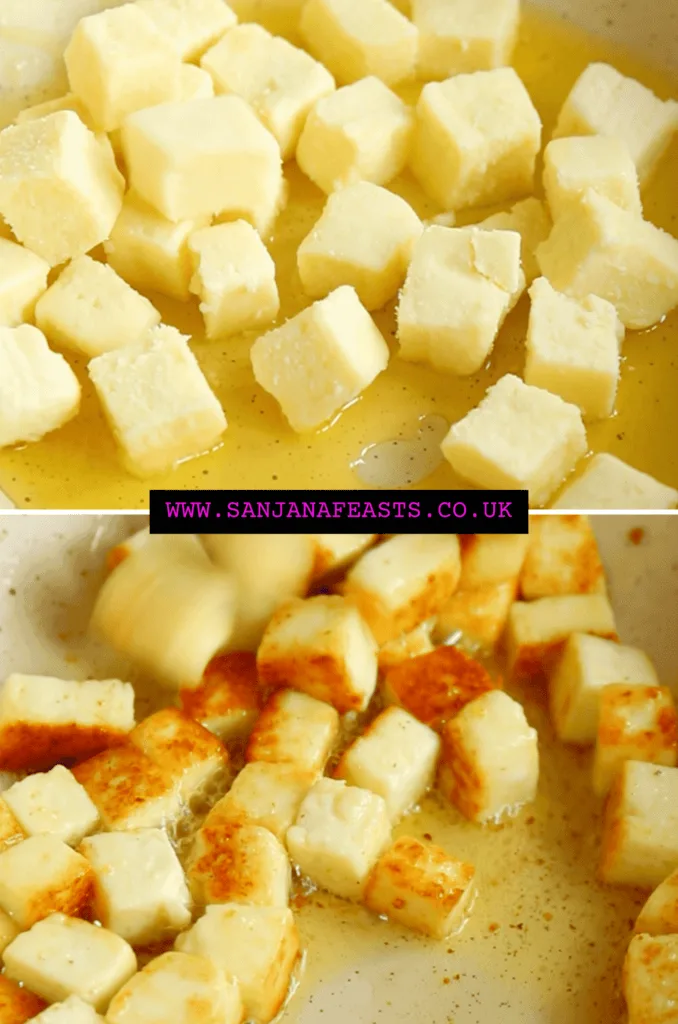
This is an optional step. I like the golden colour of the paneer in this curry and the first texture of paneer in a dry curry.
You can use any of the above cooking methods for the paneer, or choose to avoid pre-cooking it. The choice is yours.
2. Cook the whole spices and aromatics
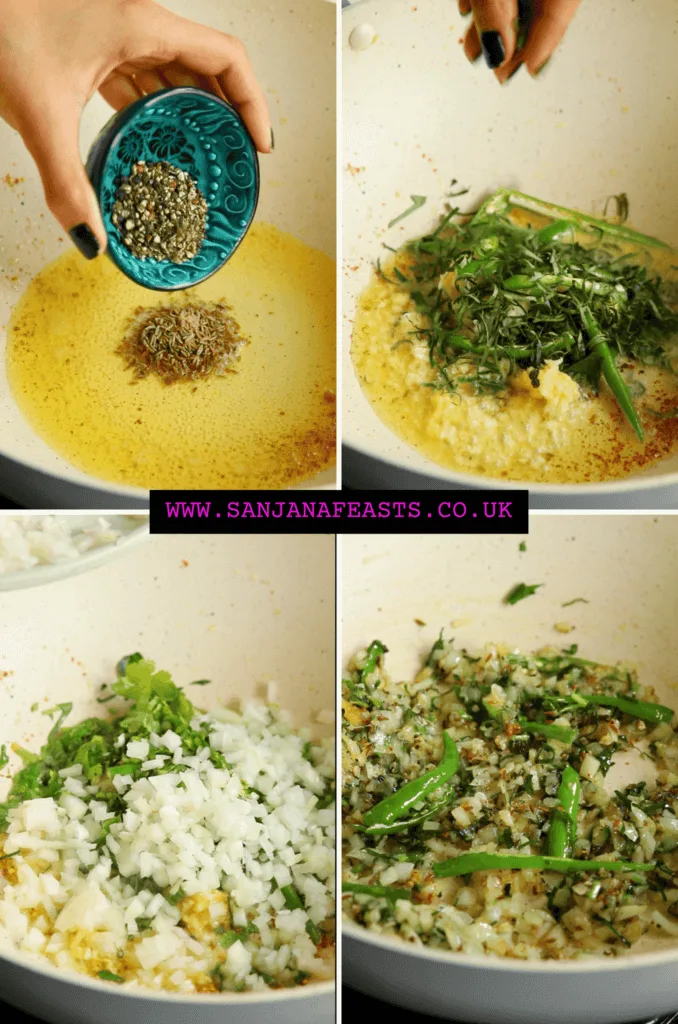
As is the case with any curry, it’s important to temper the spices in hot fat before you begin adding other ingredients.
Indeed, most spices are fat soluble, which means their favours are best extracted through oil or ghee.
3. Brown the onions
Before adding the paneer, it’s a good ideas to spend a few minutes browning the onions and cooking the aromatics down. Do this over a low heat.
The sweetness of browned onions (bhuna) will balance the heat of the chilli and the sourness of the tomato.
4. Add tomatoes and dry spices… Now wait for the oil to separate
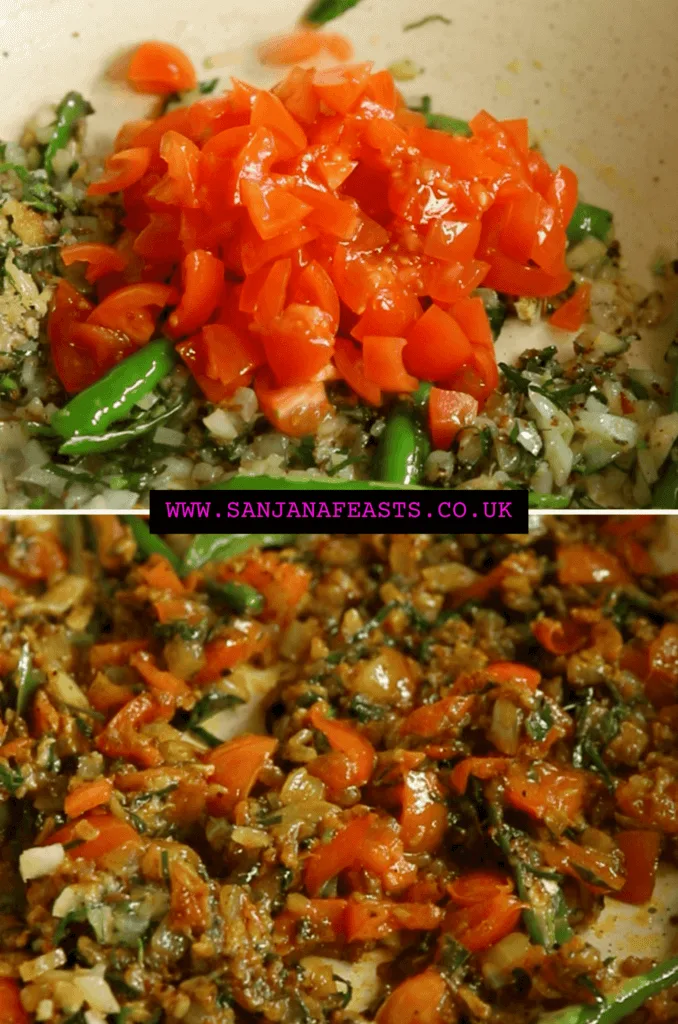
Cook the tomatoes until they soften. Mash with the back of a spoon to create a rough paste. The mixture doesn’t need to be smooth.
Add dry spices at this stage and keep the heat low as dry spices burn quickly. Add a splash of water if you notice the spices are burning.
Finally, when you notice the ghee or oil starting to separate from the tomato mixture, it’s ready for the paneer.
5. Toss the paneer into the curry
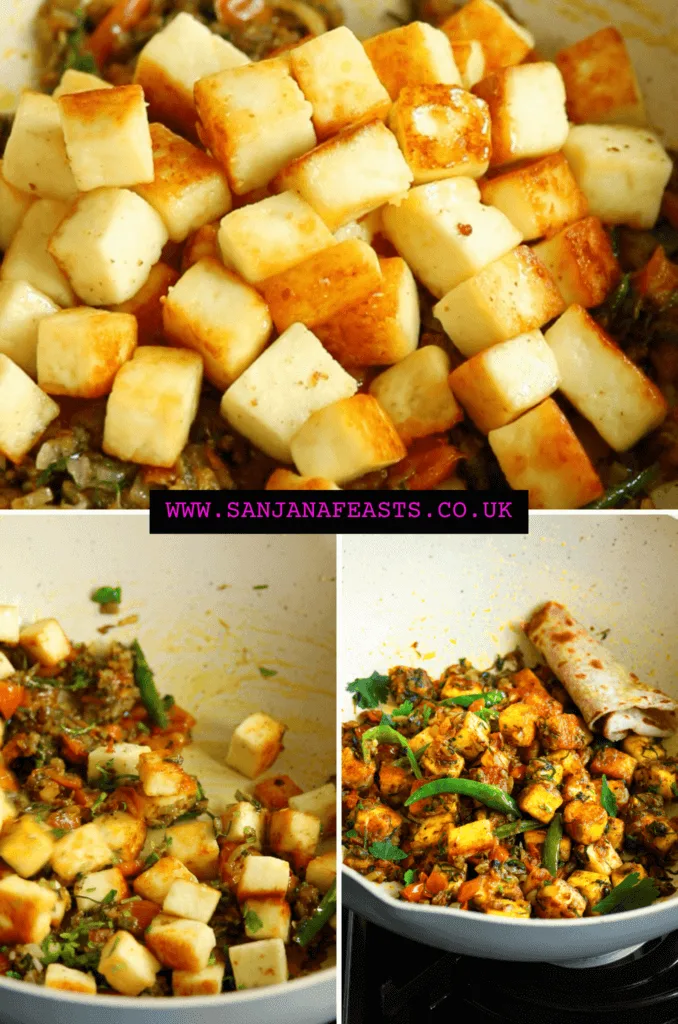
Toss the paneer in the gravy and heat through. Since the masala was perfectly cooked, it will cling to each piece nicely.
How to make paneer gravy for dosa
To adapt this recipe to a version with gravy, simply stir 125ml cooking cream through the curry at the end of the cooking process. Bring to a very gentle simmer and your paneer curry with gravy is ready.
If you don’t want to use cream, add an extra tomato and some water.
Serve the curry alongside the dosa, rather than inside it.
Are Paneer Masala Dosa vegan?
No, this recipe is not vegan friendly, due to the dairy in the paneer. Give it a go with tofu, soya chunks, tempeh or seitan.
Are Paneer Masala Dosa gluten free?
This recipe for paneer masala dosa is free from gluten. However, check the label on asafoetida, since some commercial brands contain wheat flour.
What is paneer tikka dosa?
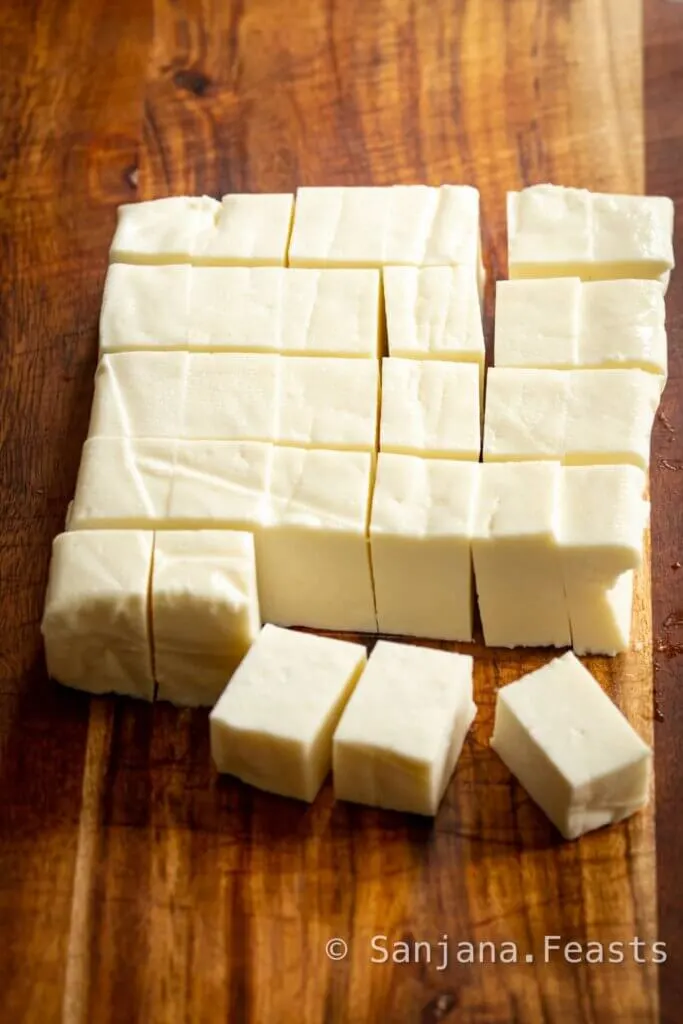

Paneer tikka dosa is a variation of the traditional dosa that features paneer tikka as its filling.
Paneer Tikka is a popular Indian appetiser made by marinating cubes of paneer in a spicy yoghurt-based marinade and then grilling or baking until golden and slightly charred.
To make paneer tikka dosa, the dosa batter is spread out on a hot griddle and cooked until crispy.
Finally, once the bottom of the dosa is cooked, a generous amount of paneer tikka filling is added to one half of the dosa.
The filling can include the cooked paneer cubes, onions, peppers, and other vegetables. The dosa is then folded over to create a semi-circle shape and cooked until the filling is warmed through.
Styles of Dosa
| Dosa Style | Description | Origin |
|---|---|---|
| Masala Dosa | A crispy, thin crepe made from a fermented rice and lentil batter, stuffed with a spiced potato filling. | Karnataka |
| Rava Dosa | A crepe made from a batter of semolina, rice flour, and plain flour. Crispy and lacy texture is achieved from the porous batter that is cooked on a hot griddle. | Karnataka |
| Set Dosa | A small, thick pancake made from a batter of rice and urad dal. It is served as a set of 3 or 4 and usually eaten with coconut chutney or sambar. | Karnataka |
| Pesarattu Dosa | A green crepe made of moong daal, rice, and ginger. It is nutritious and easy to digest and often served with upma and allam pachadi (ginger chutney). | Andhra Pradesh |
| Mysore Masala Dosa | Similar to the masala dosa but with an additional spread of fiery red chutney made from red chillies, garlic, and onion. | Karnataka |
| Appam | A fermented rice batter pancake with a crispy edge, made on a special curved iron pan. It is soft and spongy inside and is usually paired with coconut milk-based stew or traditional meat curries. | Kerala |
| Neer Dosa | A simple crepe made with just rice and water, with a soft and tender texture. It is served with coconut milk or chutney. | Coastal Karnataka (Mangalore) |
| Onion Uttapam | Similar to a regular dosa but has onions and green chillies added to the batter. It is thick and spongy with a soft centre and crisp edges. | Tamil Nadu |
| Egg Dosa | A crispy dosa with an egg cracked on top and cooked until the egg is set. It is served with coconut chutney or spicy onion chutney. | Kerala |
| Ragi Dosa | A crispy, nutritious dosa made from ragi (finger millet) flour and urad dal. Ragi is rich in fibre, iron, and calcium, making it a healthy alternative to regular dosa. | Karnataka |
Paneer Masala Dosa recipe | How to make Paneer Masala Dosa
Paneer Masala Dosa

Learn how to make perfect, crispy Paneer Masala Dosa. These South Indian restaurant-style dosa are stuffed with chunks of spicy paneer masala. Watch how to make Paneer Masala Dosa with my step-by-step recipe and video. From fermenting the dosa batter, to learning how to spread thin dosa, as well as dosa cooking techniques, this is the ultimate guide to making Paneer Masala Dosa at home.
Ingredients
For the dosa batter
- 650g idli rice (parboiled short-grain rice)
- 175g Basmati rice
- 1 1/2 tbsp poha (flattened rice flakes)
- 115g urad daal (white)
- 1/2 tsp methi seeds (fenugreek)
- Oil for cooking the dosa
For the paneer masala dosa filling
- 250g paneer
- 3 tbsp ghee or oil
- 1 tsp cumin seeds
- 1 tsp cracked black pepper
- 2-3 green chillies, slit
- 1 medium onion, finely chopped
- 1 large tomato, finely chopped
- 2 tsp minced ginger
- 3 large cloves garlic, minced
- 20 curry leaves, sliced into very thin strips
- 2 tbsp chopped coriander leaves, plus more for garnishing
- 1/2 tsp turmeric
- 3/4 tsp garam masala
- 1/4 tsp asafoetida
- Salt, to taste
Instructions
- In a large bowl, mix together the idli rice and Basmati rice. Wash in plenty of cold water, changing the water 3-4 times. Top the bowl up with enough cold water to cover the surface of the rice by 3-4 centimetres. It doesn't matter exactly how much, just make sure it's plenty as the rice will bloat and absorb the water as it soaks. Cover the bowl and allow to soak for 6-8 hours.
- In a separate large bowl, mix the urad daal and fenugreek seeds. Repeat the washing process, changing out the water 3-4 times. Top the bowl up with enough cold water to cover the surface of the daal by 3-4 centimetres. It doesn't matter exactly how much, just make sure it's plenty as the daal will also absorb the water as it soaks. Cover the bowl and allow to soak for 6-8 hours.
- Drain both the rice and the daal. Reserve about 100ml soaking liquid from each. Keep the rice and daal separate at this stage.
- In a high-powered blender or wet grinder, grind the rice until it is of a flowing consistency, still with some very fine grains. You might need to scrape the blender down between blitzes to ensure even blade time. Do not add too much water. If your blender is struggling, add a tablespoon of water at a time. The aim of the game is to add as little water as possible. The batter should feel like very fine grains of salt when the batter is rubbed between the thumb and forefinger. If you're a visual learner, watch my recipe video to see the exact consistency required. Transfer the mixture to a large bowl.
- Next, grind the daal and methi mix, along with the poha. This time, you're looking for a very smooth batter with no gritty feeling when rubbed between the thumb and forefinger. Add this to the bowl along with the ground rice batter. Again, try to add as little water as possible whilst grinding.
- Use your fingers to whip the batters together until well combined. Cover tightly and keep the bowl in a warm place for 8-12 hours, until bubbly, risen and fermented. You will be able to smell when it's done (it will have a sour, beer-like smell). If you keep the bowl somewhere cooler, the batter will take much longer to ferment so try to pick a very warm spot. Also, ensure your bowl is deep enough as the batter will rise up and overflow in a small bowl.
- Once the mixture has fermented. add salt. Do not add salt prior to the batter reaching the correct stage as it will delay the fermentation process. For the total amount of batter, I added about 1 1/2 tsp salt but start off with less and taste before adding more. This is a personal choice.
- Adjust the consistency of the batter with a little bit of fresh water at a time. Beat with a ladle and check if it is of a thick, flowing consistency. Again, please refer to the video if you're not sure what I mean by this. When dropping the batter from a height it should billow off the ladle and flow like lava, slowed by the air bubbles inside. This is why it's important not to add too much water when grinding; You can always add water, but you can't take it out. The flavour and smell should be a happy kind of sour.
- Congrats, your dosa batter is now ready. Keep it covered and at room temperature until you're ready to use it. If you're not using it on the same day, you can also store it in the fridge for up to 3 weeks. It will become more sour over time, which adds to the delicious flavour.
- To make the paneer masala dosa filling: Heat the ghee or oil in a large non-stick pan. Add the paneer and sauté on all sides until lightly golden brown. Be careful as it can splutter. Once golden, remove the paneer from the pan and place into a colander to while you prepare the rest of the curry.
- Into the remaining ghee or oil, add the cumin seeds, black pepper, asafoetida, ginger, garlic, chillies, curry leaves, coriander and onions. Sauté for 4-5 minutes over a low heat, until the onions soft and begin to caramelise around the edges.
- Add the tomato, turmeric, garam masala and salt. Cook for another 2-3 minutes, until the tomatoes soften. Mash them down with a spoon as they cook to create a thick paste. If you notice the mixture begins to burn, add a small splash of water. Mix until you start seeing ghee or oil separating at the sides of the pan.
- Finally, return the fried paneer to the pan and mix to coat all the pieces in the masalas. Continue to cook and heat through for 1-2 minutes. Sprinkle with additional coriander (optional) and serve.
To cook the Paneer Masala Dosa
- For cooking Paneer Masala Dosa, a large, flat tawa is preferable. Cast iron and anodised aluminium will give you the most golden finish, but they can be tricky to work with (the dosa can stick if the pan isn't properly seasoned). In any case, ensure cast iron is very well seasoned if you choose to use it. I use cast iron and anodised aluminium interchangeably. You can also make the dosa in a non-stick frying pan but the colour may not be quite as golden brown. Do not use ceramic-coated pans or stainless steel. Make the dosa as big or as small as you like. Start small if this is your first go.
- Heat the pan until it's smoking hot, a few minutes will do. Turn the heat down and flick it with some water to temper the heat. The water should sizzle and evaporate quickly. Rub the pan with an onion half dipped in oil (poke it onto a fork if you like). This is said to add flavour and stop the dosa from sticking. You can also just wipe the pan quickly with a paper towel dipped in oil.
- Pour the batter: Using a ladle, pour a spoonful of dosa batter on the tawa's hot surface. Start from the centre of the tawa and use the ladle to spread the dosa batter thinly and evenly, in a circular motion.
- Add a teaspoon of oil around the sides of the dosa and on top of it. This will help to cook the dosa evenly, with a golden brown colour and also prevent it from sticking to the tawa. Cook over a medium-low heat for 3-4 minutes for the crispiest dosa.
- Once you spot the dosa starting to brown, the edges should start lifting away from the pan. If using cast iron or anodised aluminium, you might need to help it along using a spatula. Try not to prise the dosa from the pan - it will tell you when its ready by coming away by itself.
- Spoon some of the paneer masala filling on top of the dosa and carefully begin to roll it into a cylinder. The underneath should reveal a beautiful golden brown colour. Remove the rolled masala dosa from the tawa and serve immediately with coconut chutney and sambar.
- Repeat the process for the remaining batter, wiping the pan with a lightly-oiled paper towel or cut onion each time. Remember to heat the pan sufficiently each time. Keep the dosas warm in a low oven for 15-20 minutes if you need to. Any longer and they will dry out.
Notes
- Use this dosa recipe to make Classic Masala Dosa with Potato Filling, plain dosa (Sada Dosa), ghee dosa, butter dosa or even Uttapam.
- Serve the Paneer Masala on its own with roti, naan or paratha for a quick and delicious weeknight curry option.
- Spread the batter very thinly for an excellent Paper Dosa.
- The dosa batter can be made in advance and kept in the fridge for up to 3 weeks. You can prepare the paneer filling 24-48 hours ahead, if necessary.
- Experiment and try adding your favourite toppings to make customised dosa.
- Masala Dosa are best eaten straight away. If you must reheat them, try popping them back onto the tawa or in a frying pan with a little butter or ghee to crisp them up again. Be sure to heat through thoroughly.
Nutrition Information:
Yield: 6 Serving Size: 1Amount Per Serving: Calories: 528Total Fat: 24gSaturated Fat: 10gTrans Fat: 0gUnsaturated Fat: 11gCholesterol: 45mgSodium: 680mgCarbohydrates: 62gFiber: 4gSugar: 3gProtein: 16g
More Indian Breakfast recipes you might like


With love and Paneer Masala Dosa,
Sanjana

Chilli Paneer (Restaurant Style) - Indo-Chinese Recipes - Easy Recipe
Tuesday 29th of August 2023
[…] Chilli Paneer, Veg Manchurian, Hakka Noodles, Spring Rolls, Mixed Rice & Noodle Sizzler and even Paneer Dosa. […]